Sunday, August 9, 2009

Windows 7 RTM 64-bit install on a DELL XPS 1330

I opted to install the final RTM on my XPS 1330 as a new install.  Moving from 32-bit to 64-bit does not allow for a direct upgrade.

My primary worry was my Virtual Machine running in Windows 7 RC….but i didn’t think to resume them and take them out of hibernation (my only mistake in my upgrade).

So…if you are making the move to the new RTM, make sure you log into any hibernated Virtual PC’s and shut them down.

Steps I took:

  1. Backup really important stuff…cause you never knowimage
  2. Made a DVD from the Win7 ISO.  I had to do a install from a DVD as it did not let me do an install from Disk because i was going from 32 to 64
  3. Rebooted the XPS 1330 and booted with the Win7 64Bit DVD
  4. During the Win 7 install, it asks you what partition to install too.  It took the opportunity to clean up my Dell Factory shipped Partitions.
  5. Install went from 11:12pm to 12:20am.  At that point i joined my WiFi Network and ran Windows Update.
  6. Installed Microsoft Security Essentials (64-bit) – Virus protection is important :)
  7. Downloaded the latest Windows 7 nVidia drivers nVidia here: http://www.nvidia.com/object/geforce_notebook_win7_x64_186.03_whql.html
  8. Installed Office 2007 Enterprise, Project, Visio, Sharepoint Designer, Windows Live Suite.
  9. Setup my Fingerprint to log into my new fresh Windows 7 Ultimate!

From this base installation, i then added my development support…

  1. Installed Virtual PC from Here http://www.microsoft.com/windows/virtual-pc/download.aspx
  2. Tested my Virtual PC’s…they failed due to the hibernation issue mentioned earlier.  After it deleted the hibernation files, they booted perfectly.  Virtual PCs include:  Windows Server 2008 with MOSS 2007/Visual Studio 2008/SQL Server 2008, Windows XP
  3. Installed Windows 7 RTM 32-bit client as a Virtual PC
  4. Installed Office 2010 on the Win7 Virtual PC
  5. Tested integration…works like a charm.

Other software that i installed that worked were:

  • DVDFab 6 – to copy DVD’s – a great way to keep our DVD library disks away from the kids and have them all on Media Center
  • iTunes with QuickTime – iPhone still syncs
  • VirtualCloneCD – virtual DVD’s (ISO’s) still mount
  • Skype
  • Reconnected my bluetooth devices – iPhone (for tethering), MS Presenter Mouse 8000 (for great presentations).

Next for the upgrade

  • Toshiba M200 Tablet PC
  • HP tx1000 Notebook
  • HP Pavilion Slimline s3330f Desktop (our media center)

If there is anyone interested in the results of those upgrades, let me know.

Tuesday, July 14, 2009

Starbucks PC vs Mac count…

Over the last year, i started counting how many PC’s vs Mac’s i have been seeing during my coffee break at Starbucks.  Its kinda become an obsession now with my buddies and I about how the count has been changing (or not).

So today, we decided to start Tweeting what we find :)

Expect a tweet from in the following format:

#Starbucks #PCvsMac 4-1 (maybe location pointer too)

meaning

At Starbucks, today i Observed 4 people with a PC notebook and 1 person with a Mac notebook.  If i have time, i’ll add my geolocation too.

Kinda interesting…  (or maybe i’m must obsessed)

Feel free to tweet with me!!!

S.

Excel Web Services and that Currency, Accounting format (bold) issue

I have been working with the Microsoft QA team on the Excel Services issue i blogged about earlier.  It turns out to fix the problem, install any custom fonts used by our excel spreadsheet that will be consumed through Excel Web Services on the server.  After you install the fonts on the server, an IIS Reset is required for it to take.

After doing so, Bold type fonts will render correctly.

Thanks MS QA for your help on this!

S.

Thursday, July 9, 2009

Just a Restart made it work... Expression Blend 3.0 RC

OK,...after a simple restart after the crash worked.  The Zune3D and other samples are really cool.


Can't play with it more....


S.

Expression Blend RC 3.0 First Try…


Well, my first attempt to open Expression Blend 3.0 RC today generated this error message when i tried to open the Sample Project “Zune3D (Silverlight)” example.  Ouch….

image

Will update you all again after i restart my PC…maybe its just a passing thing….

S.

Thursday, July 2, 2009

Windows 7 – Add your own search engines!

Love this feature i stumbled across Sarah Perez’s (Chanel 10 Blogger) site… http://cid-781010de23482939.profile.live.com/

She shows a way to add Windows 7 Search context’s to the Windows Explorer.

I took her example of how to search the Microsoft Support site and updated it with BING (she was using live), then found another one for Twitter and finally created my own for MSDN searches.

You can grab them from my skyDrive here:

http://cid-4320f28e64229e18.skydrive.live.com/embedrow.aspx/Public/Windows7SearchAdd-ins


Just download them, and open them up.  Windows will ask you if its ok to register them and voila!  You get search power right from Windows Explorer:

image

Hide Live Messenger from the Windows 7 Start Menu Taskbar

I just wanted my Messenger to hide the way it did in Windows Vista and XP.

Right now, when you minimize Windows Live Messenger, it takes up a lot of space in your taskbar.

image

So here’s a trick i found out when testing some code for Windows 7…

If you set the properties of an application to run as an older OS, it will allow the app to behave like it did in the “old” days.

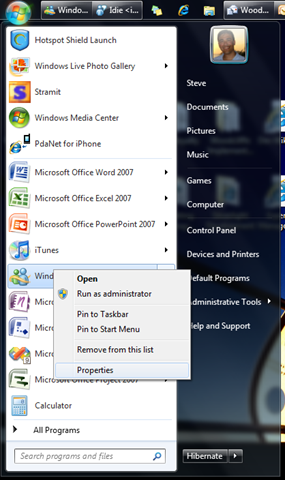
So find your Messenger in your “Start Menu” and right click on it and select “Properties”

image

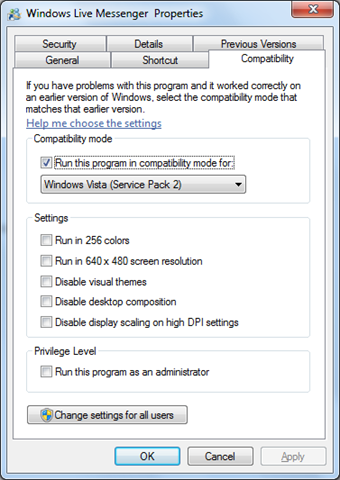
Then from the Compatibility tab, set the mode to “Windows Vista”

image 

Make sure to Restart Messenger and you done.

Now when you close your messenger window, it will run the way it did in the background accessible from your notification area.

image 

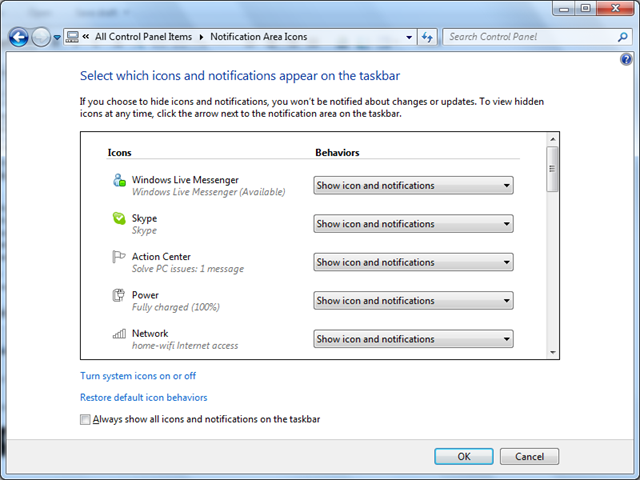
The last thing you might want to do is tell Windows 7 to always show the icon so you have it always ready to go…

From the Control Panel, click Notification Area Icons and set the Windows Live Messenger to “Show icon and notifications”.

image

Cheers

S.